2 Saving and Loading Projects and Media
After you’ve created a project, you’ll want to save it, so that you can have access to it the next time you use Snap!. There are two ways to do that. You can save a project on your own computer, or you can save it at the Snap! web site. The advantage of saving on the net is that you have access to your project even if you are using a different computer, or a mobile device such as a tablet or smartphone. The advantage of saving on your computer is that you have access to the saved project while on an airplane or otherwise not on the net. Also, cloud projects are limited in size, but you can have all the costumes and sounds you like if you save locally. This is why we have multiple ways to save.
In either case, if you choose “Save as…” from the File menu. You’ll see something like this:
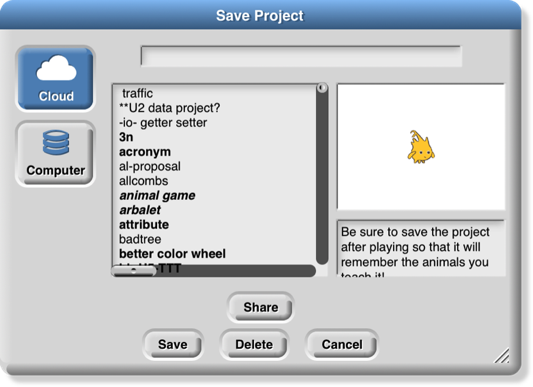
(If you are not logged in to your Snap! cloud account, Computer will be the only usable option.) The text box at the bottom right of the Save dialog allows you to enter project notes that are saved with the project.
Local Storage
Click on Computer and Snap!’s Save Project dialog window will be replaced by your operating system’s standard save window. If your project has a name, that name will be the default filename if you don’t give a different name. Another, equivalent way to save to disk is to choose “Export project” from the File menu.
Creating a Cloud Account
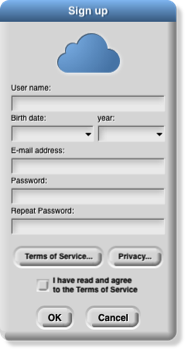
The other possibility is to save your project “in the cloud,” at the Snap! web site. In order to do this, you need an account with us. Click on the Cloud button ( ) in the Tool Bar. Choose the “Signup…” option. This will show you a window that looks like the picture below:
You must choose a user name that will identify you on the web site, such as Jens or bh. If you’re a Scratch user, you can use your Scratch name for Snap! too. If you’re a kid, don’t pick a user name that includes your family name, but first names or initials are okay. Don’t pick something you’d be embarrassed to have other users (or your parents) see! If the name you want is already taken, you’ll have to choose another one. You must also supply a password.
We ask for your month and year of birth; we use this information only to decide whether to ask for your own email address or your parent’s email address. (If you’re a kid, you shouldn’t sign up for anything on the net, not even Snap!, without your parent’s knowledge.) We do not store your birthdate information on our server; it is used on your own computer only during this initial signup. We do not ask for your exact birthdate, even for this one-time purpose, because that’s an important piece of personally identifiable information.
When you click OK, an email will be sent to the email address you gave, asking you to verify (by clicking a link) that it’s really your email address. We keep your email address on file so that, if you forget your password, we can send you a password-reset link. We will also email you if your account is suspended for violation of the Terms of Service. We do not use your address for any other purpose. You will never receive marketing emails of any kind through this site, neither from us nor from third parties. If, nevertheless, you are worried about providing this information, do a web search for “temporary email.”
Finally, you must read and agree to the Terms of Service . A quick summary: Don’t interfere with anyone else’s use of the web site, and don’t put copyrighted media or personally identifiable information in projects that you share with other users. And we’re not responsible if something goes wrong. (Not that we expect anything to go wrong; since Snap! runs in JavaScript in your browser, it is strongly isolated from the rest of your computer. But the lawyers make us say this.)
Saving to the Cloud
Once you’ve created your account, you can log into it using the “Login…” option from the Cloud menu:
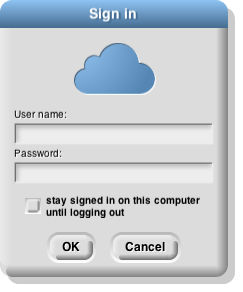
Use the user name and password that you set up earlier. If you check the “Stay signed in” box, then you will be logged in automatically the next time you run Snap! from the same browser on the same computer. Check the box if you’re using your own computer and you don’t share it with siblings. Don’t check the box if you’re using a public computer at the library, at school, etc.
Once logged in, you can choose the “Cloud” option in the “Save Project” dialog shown on page 37. You enter a project name, and optionally project notes; your project will be saved online and can be loaded from anywhere with net access. The project notes will be visible to other users if you publish your project.
Loading Saved Projects
Once you’ve saved a project, you want to be able to load it back into Snap!. There are two ways to do this:
1. If you saved the project in your online Snap! account, choose the “Open…” option from the File menu. Choose the “Cloud” button, then select your project from the list in the big text box and click OK, or choose the “Computer” button to open an operating system open dialog. (A third button, “Examples,” lets you choose from example projects that we provide. You can see what each of these projects is about by clicking on it and reading its project notes.)
2. If you saved the project as an XML file on your computer, choose “Import…” from the File menu. This will give you an ordinary browser file-open window, in which you can navigate to the file as you would in other software. Alternatively, find the XML file on your desktop, and just drag it onto the Snap! window.
The second technique above also allows you to import media (costumes and sounds) into a project. Just choose “Import…” and then select a picture or sound file instead of an XML file.
Snap! can also import projects created in BYOB 3.0 or 3.1, or (with some effort; see our web site) in Scratch 1.4, 2.0 or 3.0. Almost all such projects work correctly in Snap!, apart from a small number of incompatible blocks.
If you saved projects in an earlier version of Snap! using the “Browser” option, then a Browser button will be shown in the Open dialog to allow you to retrieve those projects. But you can save them only with the Computer and Cloud options.
If you lose your project, do this first!
If you are still in Snap! and realize that you’ve loaded another project without saving the one you were working on: Don’t edit the new project. From the File menu  choose the Restore unsaved project option .
Restore unsaved project will also work if you log out of Snap! and later log back in, as long as you don’t edit another project meanwhile. Snap! remembers only the most recent project that you’ve edited (not just opened, but actually changed in the project editor).
If your project on the cloud is missing, empty, or otherwise broken and isn’t the one you edited most recently, or if Restore unsaved project fails: Don’t edit the broken project. In the Open… box, enter your project name, then push the Recover button . Do this right away, because we save only the version before the most recent, and the latest before today. So don’t keep saving bad versions; Recover right away. The Recover feature works only on a project version that you actually saved, so Restore unsaved project is your first choice if you switch away from a project without saving it.
To help you remember to save your projects, when you’ve edited the project and haven’t yet saved it, Snap! displays a pencil icon to the left of the project name on the toolbar at the top of the window:
Private and Public Projects
By default, a project you save in the cloud is private; only you can see it. There are two ways to make a project available to others. If you share a project, you can give your friends a project URL (in your browser’s URL bar after you open the project) they can use to read it. If you publish a project, it will appear on the Snap! web site, and the whole world can see it. In any case, nobody other than you can ever overwrite your project; if others ask to save it, they get their own copy in their own account.